GNOME Security Internship - Update 1
If you missed it, the introduction to this project can be found here.
Check if we are in a working state
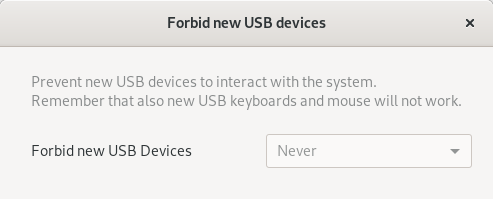
Before letting the user select the desired level of USB protection, we check if we are in a working state. Meaning for example that USBGuard needs to be installed and the corresponding DBus service needs to be active.
If these conditions are not met, we grey out the dropdown menu in GNOME-Control-Center.
This method probably can be improved showing also the reason of the non working state to the users.
“allow” wildcard rule
As I mentioned in my previous blog post, we can’t get or set ImplicitPolicyTarget from the USBGuard configuration.
While the PR is still open, we worked around this issue using the rule file.
Prepending a wildcard allow rule allow *:* we are now able to reach a state where every new inserted devices are automatically allowed.
It works like this:
- If you set the protection level to
Never, GNOME-Control-Center (g-c-c) setsInsertedDevicePolicytoapply-policyand add at the beginning of the rule fileallow *:*. In this way when a new USB device is plugged:- USBGuard checks
InsertedDevicePolicy. Because it is set toapply-policyit goes to the step 2. - USBGuard checks the rule file for a matching rule.
allow *:*matches, and so the device gets authorized to work.
- USBGuard checks
- If you set the protection level to
Always, g-c-c setsInsertedDevicePolicytoblock. When a new USB device is plugged:- USBGuard checks
InsertedDevicePolicy. Because it is set toblockthe device gets blocked without checking the rule file.
- USBGuard checks
Fail-safe mode
Using the allow wildcard is also useful for reaching a fail-safe mode when we want USB protection when the lock screen is active. What does fail-safe mean? Let me give you a real world example:
The user sets the USB protection level to “when lock screen is active”, so when the session is unlocked he can freely plug in USB devices. But when the session gets locked all new USB devices needs to be blocked.
The logic here is bounded in GNOME-Shell’s lock and unlock functions.
When a lock happens we set InsertedDevicePolicy to block.
When the session is unlocked we set InsertedDevicePolicy to apply-policy.
But what happen if the user activates the lock screen and then GNOME-Shell crashes?
After a reboot InsertedDevicePolicy will continue to be at block, so is the user locked out? No because there is a trick.
When USBGuard service starts there is another config variable that gets checked: PresentDevicePolicy.
This rule regulates how to handle already connected USB devices.
By default it is set to apply-policy, meaning that it will check the rule files and, if there isn’t a match, the ImplicitPolicyTarget value.
And because we have an allow *:* in our rule file, already present devices will get authorized.
Oof, there is a lot in this section. But there is one last thing.
Ok, we are not locked out because we can still use our plugged in, at boot time, USB devices, great.
But what about InsertedDevicePolicy? It is stuck to block while it should be at apply-policy, how we reset it now?
If you end up in this situation, you can invoke the lock screen one single time and everything will return as it should.
Reflect manual user changes
USBGuard can now be configured from GNOME-Control-Center, awesome.
But what happens if I set something from g-c-c and later I manually edit the USBGuard configuration within the CLI or DBus?
In order to reflect the current USBGuard status we subscribe to the new PropertyParameterChanged signal.
If the protection level was “Always” but InsertedDevicePolicy gets changed to apply-policy, or also the other way around, if the protection level was “Never” but InsertedDevicePolicy gets changed to block, it’s save to assume that the user manually changed the USBGuard configuration.
So we change the displayed value accordingly (without further changing the current USBGuard config values).
Notification for blocked USB devices
If a new USB device has been blocked because plugged in when the session was locked, we display a notification to inform the user that he needs to replug his device.

Step 3 - From static to dynamic
Until now everything has been achieved with a “static” configuration of USBGuard.
That means that we edited USBGuard in order to let it do what we wanted, but we were not actively listening to USBGuard events, like to the signal DevicePrecenceChanged.
With this static configuration we probably can’t do much else, we reached the capability limit. This is the reason why now everything has been switched to be more dynamic.
Now the new GNOME-Shell’s USB component, similarly to the Thunderbolt one, actively listens to USBGuard signals and act accordingly.
What to expect next and comments
The two major things to expect are: smarter way to handle keyboards even if the protection is active (what happens if my keyboard breaks?) and also trying to add some sort of protection even when the session is unlocked (improving in this way the “block all” that we have right now).
Feedback is welcome!
Comments
Bastien
The integration between USBGuard and the settings should be done in a separate gnome-settings-daemon helper. GNOME-Shell should only be used to display a menu, it shouldn’t be integrating with USBGuard directly. See similar integration in Thunderbolt, or power management, support.
Leave a Comment
Your email address will not be published. Required fields are marked *